 Defender 110 Door Hinges, Latches, Locks, and Hardware |
|
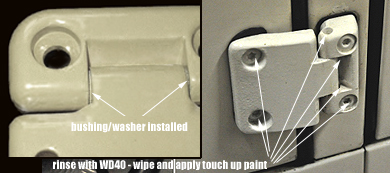
The NAS Defender door hinges commonly start corroding from inside. A quick fix when very light signs of rust start to show around the hinge, is to simply spray the hinge thoroughly with WD40, rinse, and wipe clean the area using cleaning alcohol. Let the hinge dry and apply touch up paint and lubricant as needed.
Shown above, newer model Defender door hinges solve this problem. A small bushing/washer is added to isolate hinge halves from riding on each other. The addition of a bushing/washer to the hinge prevents subsequent rust bleeding through the hinge and pin area on the 110. The hinge shown above was removed, primed, and painted prior to installation.
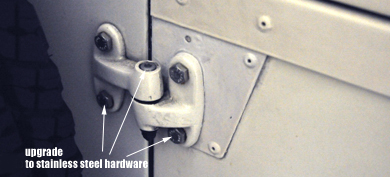
The new hinges come treated from factory with a thin coat of material to help stop rust. This is a great step forward. It is, however, still necessary to prime and paint the hinges since simply spray painting them without using primer will result in rust down the line. Another great upgrade to protect the hinges and body panels at the hinge, rust free, is the use of stainless bolts throughout.
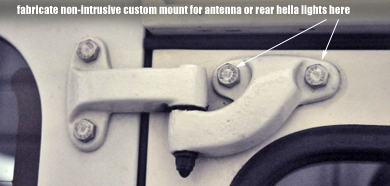
Multi purpose hinges: The ease of accessibility to the external hinges on a Defender allows for some creative custom mounting solutions. A wire antenna or rear spot lights, for example, can be easily mounted onto an "L" shaped bracket, sandwiched between the stationary half of the hinge and body panel supporting it. The roof rack and roll cage provide additional mounting spots as well. |
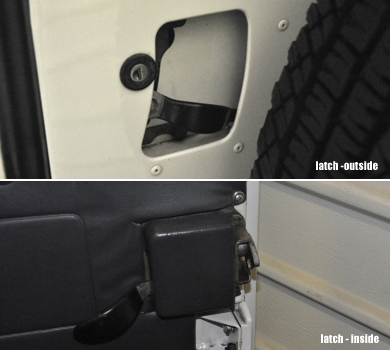
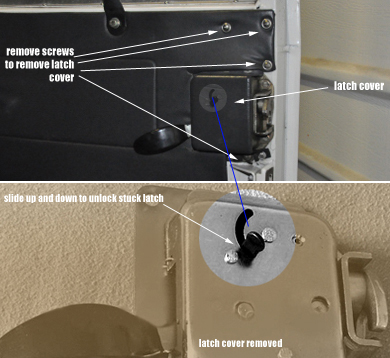
The rear door lock is a somewhat dated with spring-action intricate mechanical assembly. This assembly, if not properly maintained, can corrode from the inside and cause unwanted jams, where the door latch cannot be opened from either inside or outside the Defender.
To unlock a jammed rear door latch, remove rear door paneling by unscrewing the paneling screws as shown above. Unscrew and remove the plastic latch cover. Slide mechanical lock slider until latch is un-jammed. Apply silicon lubricant to internal latch parts from access holes to keep the latch from jamming again. |
|
Table of Contents • DefenderHelp.com is an independently owned and operated web site intended to help Defender 110 owners and is not associated with any manufacturer, vendor, or commercial entity unless otherwise mentioned clearly. We do not endorse vendors or products unless we test them, use them, like them, and find sharing the information beneficial to other Defender 110 owners. Visitors may view and use this web site at their own risk. All information and content here is provided for free. All rights reserved. Copyright DefenderHelp.com
|