 Defender 110 Headlights and Spotlights |
|
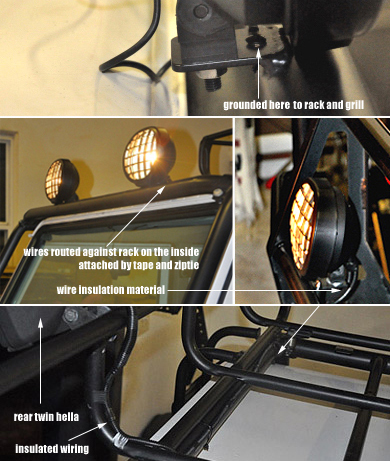
Headlights, spotlights, and auxiliary lighting systems may be installed on the stock or ARB front bumper, the roll cage, or the roof rack as needed. Using ring clamps/hardware each light may be installed without tapping any holes into the original hardware. The electrical system can be connected to a main relay or use its own relay (preferred) connected to the ignition power source under the dash or elsewhere under the hood. A rather easy to install alternative for auxiliary lights without modifying your existing electrical system is to bypass the system by connecting all positive wires from auxiliary devices directly to the battery terminal and ground the device itself to the rack, roll cage, or the front bumper. Below, one auxiliary 150amp headlight mounted on the ARB front bumper, two extra headlights mounted on the rack at 150amp each, and twin rear headlights mounted onto rear of roof rack.
Shown above small hole is drilled into the roll cage flat mount plates (not into the pipe), each light is therefore grounded locally. Assuring a good ground source may be achieved by using a voltmeter or continuity tester. The middle and bottom pictures above show both front and rear headlights/spotlights mounted external to the cage tubing. All wires are routed through flexible corrugated nylon conduit and ziptied or taped (all weather electric tape) to the tubing. This is a non-invasive method which hides all wires from sight while allowing room for future addition of wires without causing damage to tubing.
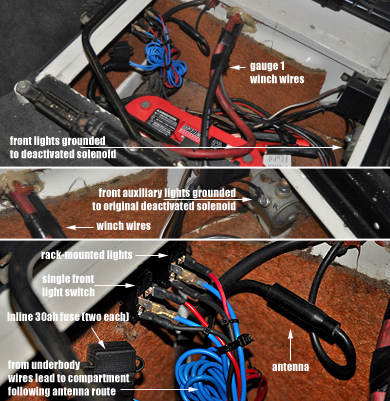
The thick 1 (or zero) gauge wires shown above directly connect winch to battery terminals. The thin blue/red/black wires connect the front auxiliary lights and battery. They include two 30amp in-line fuses and are mounted underneath the driver's seat for easy access. |
Light switches may be installed on the dash, center console, or in any area proving 3" wide x1.5" high x 2" deep. All front auxiliary lights are grounded to the deactivated winch solenoid inside the battery compartment, a reliable grounding source. Above, front auxiliary light active rocker switches installed and turned on. Trim the thick internal insulation material on the opposite side (in the battery compartment) with care to assure a clean fit. Any insulation material removed in excess of the area needed to mount the switches will lead to unnecessary air gaps and the transfer of unwanted heat in or out of the compartment.
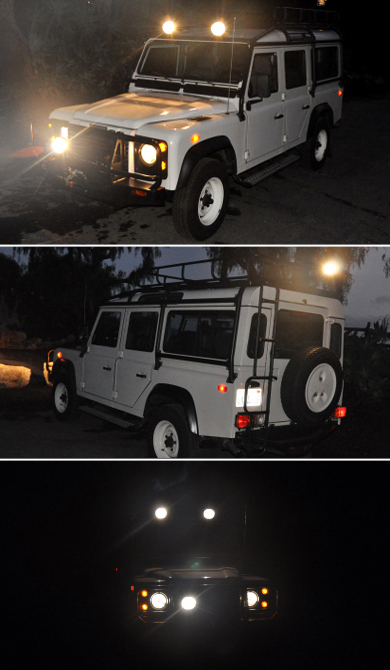
Above, all lights installed and powered. The front of the vehicle now has 750amps of combined lighting and the rear twin 300amps. Rear twin Hella lights: These lights are usually mounted to the rear section of the rack via a ring clamp screwed into the frame. It is not advised to drill holes into a stock Defender inside or out unless absolutely necessary. A well-known east coast shop, ECR, for example, uses a custom mount to install rear lights and antennas onto door hinge hardware to avoid tapping extra holes into the original body, roll cage, or roof rack. The rear headlight switch is located on the the right side of the steering column. For most, the rear headlight came factory-installed. Therefore, this switch/lever is likely already available on the steering of all NAS 93 Defender 110 vehicles. It is interesting to note, however, that the warning lamp in the instrument panel was never connected for 93 Left-hand Driver versions brought into the US in 93. In summary, regardless of the status of your rear headlights, the panel warning indicator for the rear headlights will not light up at any point. You can find various headlights, spotlights, foglights, switches, mounts, and more at RoversNorth, or simply google the keywords for more alternatives. |

|
Table of Contents • DefenderHelp.com is an
independently owned and operated web
site intended to help Defender 110
owners and is not associated
with any manufacturer, vendor, or
commercial entity unless otherwise
mentioned clearly. We do not
endorse vendors or products unless we
test them, use them, like them, and
find sharing the information
beneficial to other Defender 110
owners. Visitors may view
and use this web site at their own
risk. All information and content here
is provided for free. All rights
reserved. Copyright DefenderHelp.com
|