 Defender 110 Front and Rear Brakes |
|
The NAS Defender 110 has two front disc brakes and two rear drum brakes. The rear drum brakes may be converted/upgraded to aftermarket disc brakes using a combination of several aftermarket and genuine disc brake parts, or as a more viable solution, the rear axle may be upgraded entirely to a Salisbury rear axle accommodating for disc brakes. Salisbury rear axles come ready to bolt in. Remove stock rear axle and put the Salisbury rear axle in place. Rear shaft splines and diameter may also be upgraded at this time. If your front and rear shocks and coil springs are due for replacement, this is a good time to perform those installations as well. To replace stock front or rear brake components, lift up front or rear end, and remove wheel as shown below.
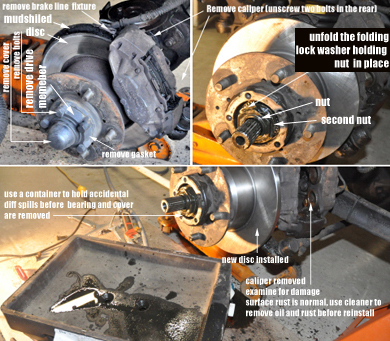
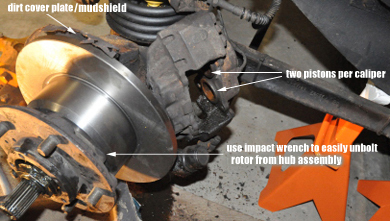
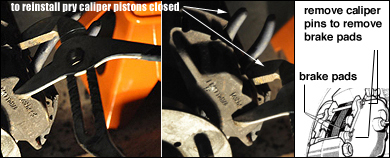
Front disc rotor replacement: To replace front disc, pull firmly to remove plastic hub cover/cap, shim, and circlip. Place a plastic spill tray under the brake assembly to protect the ground against excess brake or differential hub leak. Remove drive member and remove hub gasket. Using pliers, gently unfold the folding lock washer. Unbolt and remove the large nut holding the folding lock washer in place. Remove folding lock washer. Remove secondary nut and aft-washer. Remove wheel bearing. Remove caliper and brake line first: Before the hub assembly can be removed, remove brake pad spring clips and pins and remove brake pads. Unbolt the two bolts holding the front caliper in place. Then unbolt two bolts and remove the pipe bracket holding caliper brake line in place. Make sure not to damage your brake line during and after caliper removal procedure. Gently rest caliper and brake against lower arm. Make sure it is rested securely to prevent caliper from damaging the brake line and vise versa. Once caliper is removed, return to hub assembly. Gently play and pull until assembly is removed. Unbolt the bolts holding hub assembly and front rotor together using an impact wrench. Make sure the surface of your new disc rotor is clean and free of grease and contamination. DO NOT use WD40 to clean brake components--once heated, WD40 will ignite and cause fire. If necessary, use a special brake cleaner fluid/spray (available at most auto part stores) to clean rotor surfaces and other brake components. |
Bolt the hub assembly and new rotor in place and follow the steps in reverse to re-assemble the front replacing old pads with new and replacing calipers if needed.
Note: It is necessary to disconnect the brake line from the caliper when installing a new caliper. For this reason, the brake fluid must be drained. Bleeding your brake line is necessary. There are a variety of brake valve bleeder tools on the market, available online or at your local automotive part store. Make sure you are prepared for a complete brake job if you plan to replace calipers.
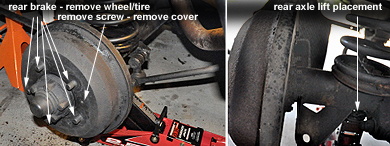
Accessing
the rear drum is relatively simple. Remove wheel/tire.
Remove one insert-screw (flat-head) shown above.
Remove cover (a.k.a., drum). Remove the springs from
the brake pads. Replace pads. You can recondition
(using 120 grit sand paper) the pads and drum by
sanding the outside surface of the pads and the inside
contacting surface of the drum. While you're at it,
it's a good idea to sand blast the outside of the drum
and paint or powder coat it before reinstalling for
added protection. RoversNorth
stocks Defender brake parts and upgrades. |
|
Table
of Contents • DefenderHelp.com is
an independently owned and
operated web site intended to help
Defender 110 owners and
is not associated with any
manufacturer, vendor, or
commercial entity unless otherwise
mentioned clearly. We do
not endorse vendors or products
unless we test them, use them,
like them, and find sharing the
information beneficial to other
Defender 110 owners. Visitors
may view and use this web site at
their own risk. All information
and content here is provided for
free. All rights reserved.
Copyright DefenderHelp.com
|