 Defender 110 Suspension Installation |
|
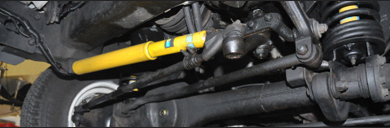
The Defender 110 has two front shock absorbers inside two front coil springs, two rear shock absorbers external to two rear coil springs, a front steering stabilizer shock, and rear sway bar. Component replacement options are many. Here, we chose heavy duty Bilstein, heavy duty front and rear shocks (the stock shocks are simply too mushy), Bilstein stabilizer shocks, and upgrade (heavy duty) OEM coil springs for front and rear. The original NAS 93 stock came with standard duty coils which are too soft all around.
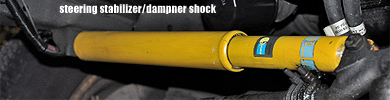
Shown above, the steering dampener/stabilizer shocks are easy to replace. They are located in a relatively easy place to reach, held by two bolts.
The replacement job is as easy as unbolting the two bolts, taking the old shock out, putting the new shock in, and bolting it in place. You will need to squeeze the shock a bit before it will fit in place. The work can be done without lifting the vehicle whatsoever.
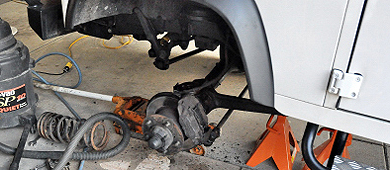
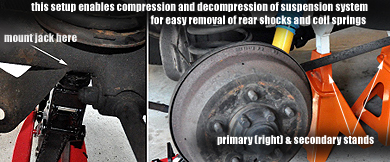
The rest of the suspension work will require that you lift the vehicle. There are specific areas to support for lift as shown in picture above (front axle/differential) and below (rear axle). Once lifted, use a jack stand (or two--redundancy in safety never hurts) to secure the chassis in place.
It is important that the stands keep the frame stationary while the front axle is free to be lifted up or down to compress and decompress shocks and coils to facilitate the replacement of those parts.
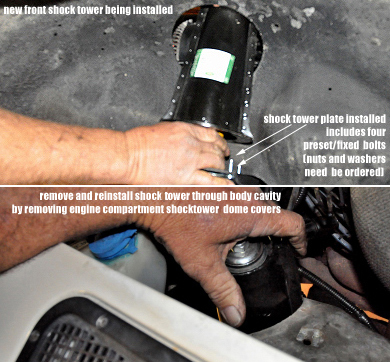
The shock tower attaches to a mount welded and sandwiched between the shock tower and shocktower mount plate. Under severe corrosion and rust, the mount itself can deteriorate beyond repair. To avoid contaminating the frame mount with excessive rust, it is best to replace the shock tower when replacing your front shocks--especially if there are signs of established corrosion at the frame mount.
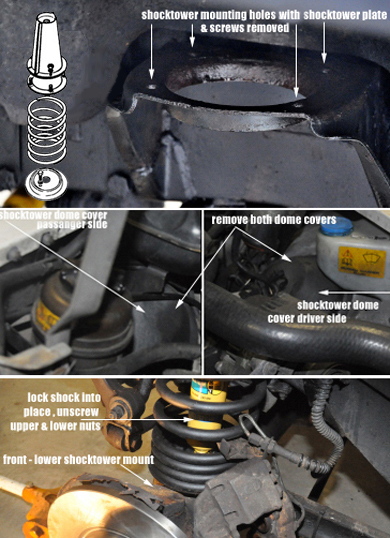
In order to remove the shock towers, open the hood and remove both dome shaped plastic cones covering the top of each tower. This will require unscrewing a few screws holding each dome and removing a few brackets, hoses, and cables temporarily out of the way. Shown above, dome covers are removed and assembled. The shock tower is being installed through the dome's access hole near the wing's air inlets, inside the engine compartment. Before removing any components, take a few digital close up photos of the mounts and components involved. This will help in making sure everything is placed in the same order it was removed, such as rubber and metal washers, tower plate, the shock tower, the brackets under the hood, and the nuts and bolts. Once removed, inspect the old components. Compare with the new replacement parts. |
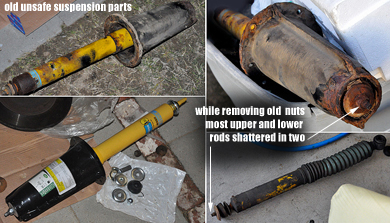
Invasive signs of corrosion, such as those shown above, are a clear indication of past-due replacement. This type visual inspection can be performed using a work light prior to removing any components. Shown above, during removal the studs and bolts snapped off.
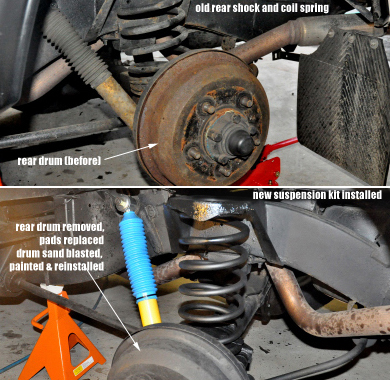
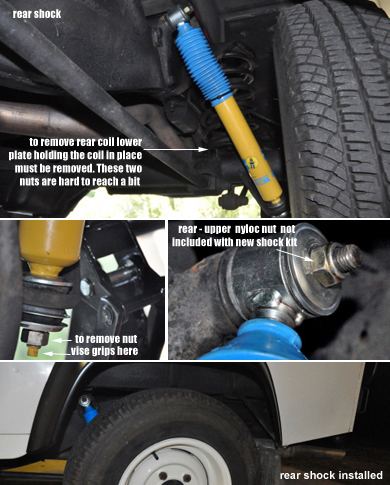
The rear axle shocks and coils are easier to replace because they are independent and external to one another. The only hard to reach parts which need to be removed in order to remove the rear coils are the bottom plate brackets holding the coil attached to the bottom plate. It consists of a rectangular bracket and two bolts located inside the coil at the bottom keeping the coil in place. Use a thin wrench to bypass the coil spring to unbolt the bracket, thus releasing the bottom portion of the coil from its mounting plate. Shown above, also see old and new sand blasted, primed drums.
The rear shocks are easy to replace. Simply unbolt one bolt on the top end and one on the bottom end of each shock. Assemble your new shocks, paying special attention to the order and direction of rubber washers and metal retainers, and install the assembled shocks by bolting each end into place. The team at RoversNorth will be able to help you with all your needs. Do not forget to order the two top Nylocks that secure the top end of each of the rear shocks. These bolts are not included in your Bilstein rear shock--only the two bottom bolts are included. Test drive. Once everything is installed, go on a test ride. No off-roading yet. Simply drive the vehicle under normal conditions for a minute or so. Return to the shop and examine all components for proper seating and so on. No matter what brand or type of shocks you choose, the recommended torque setting should be included in the instruction manual of the product. If you can't find this information, call the vendor and they should be able to help. Brake jobs. Before replacing suspension components, check your brake system, discs, pads, and calipers. Also inspect your rear drums and drum pads by removing the rear wheels and unbolting the drum housing nuts. Suspension replacement is an ideal time to address your brake needs. If you are going to replace the front brake pads and discs, then order the dust cover plates also. You will save much time having these inexpensive parts handy once everything is open and accessible. For more information, visit Front & Rear Brakes. A word on brake lines: Shocks alone do not raise a vehicle above its normal height. In order to raise your Defender one inch or three, you must purchase extended coil springs. Raising your Defender 1-3 inches does not require that you extend your brake lines. That said, if you have old lines, now will be a good time to replace them as well. Purchase a brake bleeder pump and material needed to perform a full brake job if you intend to replace brake lines while replacing suspension components. Restore your wheels: When it comes to original components, most certainly the stock wheels/rims on a NAS 110 will be rusted from the inside due to age and exposure to seasonal conditions. Once removed during suspension or brake work, take the opportunity to inspect the inside walls of each wheel. If corroded, sand paper or sand blast each wheel, and powder coat or paint each with Rustolium and epoxy paint.
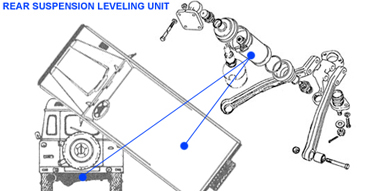
Rear Leveling Unit: Installed on all NAS 110 vehicles, the rear leveling unit is located below/center to rear side seats and consists of two major components, a hydraulic ram and shock. The ram unit keeps the back end level to prevent your sagging due to heavy rear payload. Initially when heavy payload is placed in the rear, the back end will sag, as the vehicle is driven, hydraulic ram effect takes place pumping up and leveling the back end to normal ride height. The leveling unit allows the use of softer rear springs for greater ride comfort, with the ability to self-level under larger payload. It is prone to fail. Fix: Replacement of the unit/shock or upgrading to heavy duty rear shocks and coil springs instead. Or both. |
|
Table
of Contents • DefenderHelp.com is
an independently owned and
operated web site intended to help
Defender 110 owners and
is not associated with any
manufacturer, vendor, or
commercial entity unless otherwise
mentioned clearly. We do
not endorse vendors or products
unless we test them, use them,
like them, and find sharing the
information beneficial to other
Defender 110 owners. Visitors
may view and use this web site at
their own risk. All information
and content here is provided for
free. All rights reserved.
Copyright DefenderHelp.com
|