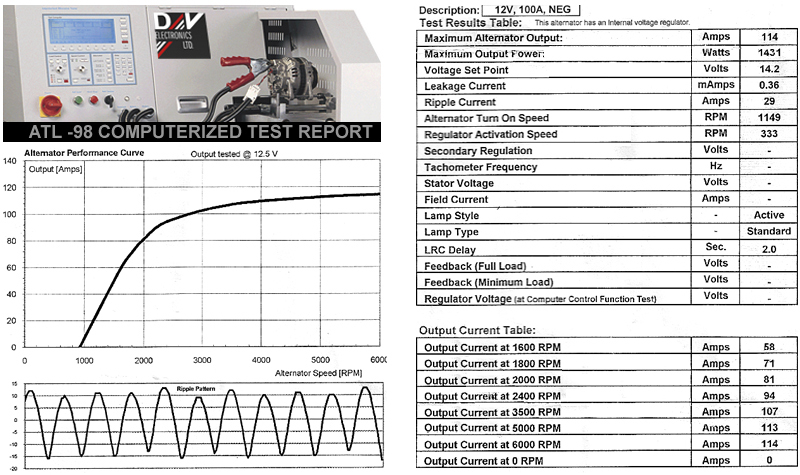
 Defender 110 Alternator - 14 Volts 100 Amps |
|
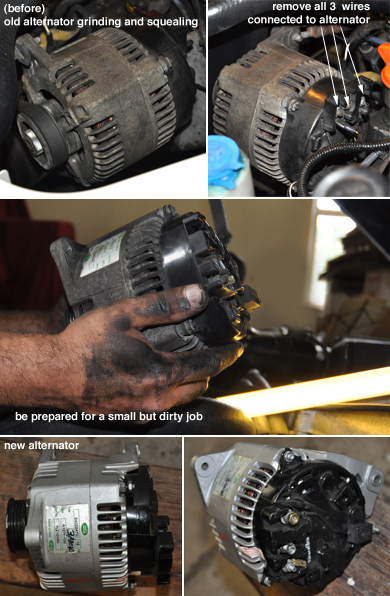
Driving down the freeway at 70mph is not exactly the ideal time to realize you have a bad alternator/bearing. You'll feel a somewhat sluggish engine and a jittery throttle all of a sudden due to the intermittent extra load the bad bearing puts on the system, causing the belt to slip or grip, and so on. You may also see your battery warning indicator light up, your tachometer jump erratically or loose RPM responsiveness all together. These symptoms can be of great concern while driving since they are very similar to those coming from an engine that is about to die. Luckily in this scenario a simple rebuild or replacement of the alternator is all that is needed.
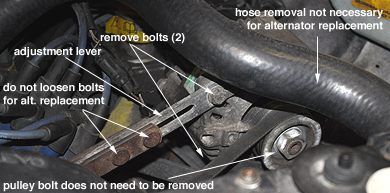
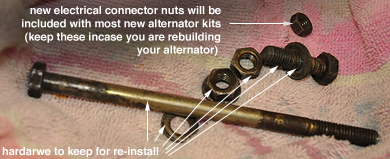
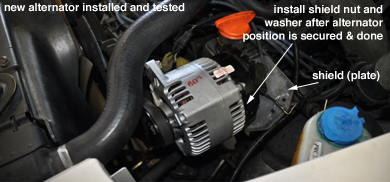
Alternator Removal: There are only two mounting bolts and three wires to be removed. The alternator belt, the adjustable mounting bracket, or the radiator hose do not need to be removed when replacing the alternator. Start by loosening the top alternator mounting bolt. Do not remove yet. The lower/longer mounting bolt has two nuts holding it in place. Remove the shield plate/outer nut and washer, you will find a second nut holding the bolt in place. |
Remove the nut. Before removing the lower/longer bolt disconnect the three wires attached to the alternator (two thin white/brown - one thick red wire).
Pivot the alternator with lower bolt in place until alternator pulley is released from belt. Remove bolt. Remove alternator.
Clean all connectors and hardware. Reinstall new alternator in reverse order. Using moderate finger/force the belt should not deflect more than 4mm to 6mm (0.19" to 0.25"). Deflection beyond this limit indicates belt looseness which may cause a loud whining or knocking noise in operation and intermittent drive. It's time to take your NAS Defender on a short test drive. Try a range of idle/RMPs, listen to the engine and watch the battery warning indicator. If there are any winding noises, squeaks, if the RMP dial is unstable, belt tension adjustment is needed, simply loosen the two mounting bolts (do not remove any), loosen the adjustment lever arm to pivot the alternator for less or more tension as needed. Use a pry bar to adjust for more tension if necessary. Once properly positioned tighten all adjustment lever arm and alternator nuts and bolts.
|
|
Table of Contents • DefenderHelp.com is an independently owned and operated web site intended to help Defender 110 owners and is not associated with any manufacturer, vendor, or commercial entity unless otherwise mentioned clearly. We do not endorse vendors or products unless we test them, use them, like them, and find sharing the information beneficial to other Defender 110 owners. Visitors may view and use this web site at their own risk. All information and content here is provided for free. All rights reserved. Copyright DefenderHelp.com
|