 Defender 110 Rear Main Seal |
|
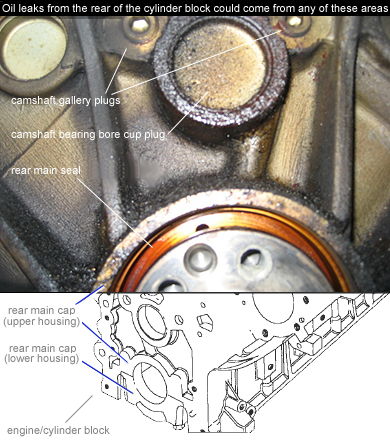
The rear main seal is located directly behind the rearmost main bearing journal of Defender's V8 crankshaft. It keeps the oil that sloshes around in the crankcase and oil pan from escaping out the back of the engine, where the crankshaft attaches to transmission. If you find fluid leaking on the rear of the oil pan between the pan and bell housing, oil spots on your driveway or an oil covered gearbox, or excess oil is dripping from fording plug outlet on a daily basis, chances are the leak is from your A) rear main seal or B) camshaft gallery plugs, or C) camshaft bore cup plug. Temporary fixes consist of adding heavy weight oil or thickeners but eventually the leaky components need be replaced. In order to replace the rear main seal on your V8 Defender engine you must access the rear main cap/lower housing area (shown below and to the right). In order to do so either the engine needs to be detached from the transmission or the transmission and drive plate/flywheel need be removed. If you were planning to rebuild your gearbox or upgrade to an R380, rebuild your engine, or planning to replace the clutch, or rebuild the transfer case, it is an ideal time to consider doing so when replacing the rear main seal. Prepare yourself for a very oily messy job. A Defender or LR speciality shop can do the work for upwards of a few hundred dollars for labor and under $50 for material. If you plan to do the work yourself, prepare for a labor-intensive project, line up the tools you need before hand, and find access to a hydraulic lift. Removing the transmission without lifting the vehicle can make this moderately simple but labor intensive project a rather complex and less enjoyable one.
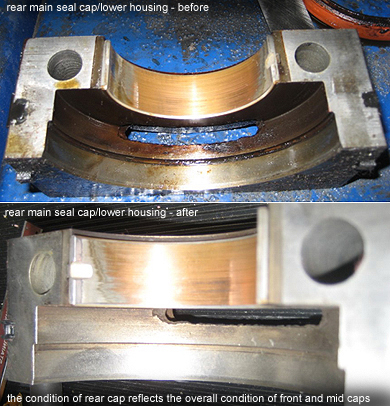
Drain the oil out of the crankcase before removing the oil pan, remove either transmission or detach engine as needed. It helps to wash the oil pan, engine underside, the bell housing/transmission to keep the work area clean and to help spot pre and aft oil leaks. If you are hoisting the engine (instead of removing the transmission), also drain the radiator and detach anything that keeps the engine from being slightly hoisted up/down. After engine is hoisted or transmission removed, remove oil pan. Proceed next with removing the rear main bearing cap/lower housing bolts. Pry off the bearing cap with a sharp putty knife. With the rear main seal cap removed gently place a flat head screw driver on the inside lip of the seal and pry the rubber seal out on one end.
|
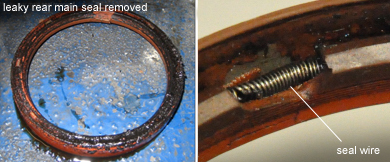
Gently grab the seal and remove it. The neoprene seal has a wire embedded in the center of it. If you are having difficulty removing the seal, try tapping on the wire until the seal moves out at the other end grab it with needle nose pliers. You can also remove the seal by using the manufacture's recommended service tool LRT54-A01 to extract the seal from its recess in the block and main bearing cap. Remove old seal. When installing a new seal examine the seal recess area for sharp edges or other irregularities which could damage the outer diameter of the new seal. Coat the seal OD with a thin layer of clean oil, place the new seal by guiding the seal lip onto the crank journal by rotating the crankshaft in the same direction while gently tapping evenly around the seal until it is seated around the circumference of the crankshaft (or use manufacturer's service tool # LRT-12-095 or RO.1014 to guide the seal in place). With the seal in position around the crank journal drift it into block seal recess by tapping it in to place using soft mallet and a piece of wood (or use MST# LRT-12-091) until the seal is positioned flush to the cap. Install main cap lower housing, clean up the oil pan, install new gasket, and oil pan into place (torque to specifications). Fill engine with oil (and coolants or transmission fluid as applicable). Start the engine and check for any leaks. If you find no leaks within a week time than your work is done. In the event that your gallery plug or camshaft bearing bore cup plug is leaking, simply remove, clean, and reseal the plugs using loctite 242 and torqued to 37-44ft lb. (gallery plug) or loctite 54041 (bearing bore cup plug).
|
|
Table of Contents • DefenderHelp.com is an independently owned and operated web site intended to help Defender 110 owners and is not associated with any manufacturer, vendor, or commercial entity unless otherwise mentioned clearly. We do not endorse vendors or products unless we test them, use them, like them, and find sharing the information beneficial to other Defender 110 owners. Visitors may view and use this web site at their own risk. All information and content here is provided for free. All rights reserved. Copyright DefenderHelp.com
|